
 What is more fun than getting your hands gooey and slimy with paper maché product? This paste is used for so many great projects but with spring forging ahead I want to bring to you just one for now: a paper maché Easter egg.
This is an easy craft project with multiple steps. The base is a balloon and you can even fill it with candy or use a really big balloon and make it a piñata. This craft is good for all ages, preschoolers and above, in child care centers, elementary schools, and home schools.
Paper Maché Easter Egg
Materials Needed:
• Plastic table cloth or old plastic shower curtain to cover the table
• 1 – round or oblong balloon (you determine the size you want)
• Newspaper cut or torn into 1″ wide strips, 6-12″ in length
• Scrap white paper, such as computer or copy paper cut or torn into 1″ wide strips, 6-12″ in length
• Paper Maché paste
• 1 – Small 5 or 12 oz foam bowl
• Tempera or poster paint
• Paint brushes
• Optional: Small wrapped candy and 1 plastic sandwich sized bag
Instructions:
Step 1 – Cover the table with the plastic to protect it.
Step 2 – Blow up the balloon. A firm balloon yields better results.
Step 3 – Prepare the paper mache paste as directed on the package.
Step 4 – Dip a strip of newspaper in the paste, then pull it gently through your fingers to remove excess paste.
Step 5 – Place the strip of newspaper on the balloon. Repeat Step 4 and Step 5 until the balloon is completely covered with 3 layers of newspaper strips.
Step 6 – Leave a 3″ in diameter area on the balloon uncovered if you plan on putting candy in it. Do this where the tied end is.
Step 7 – Set the balloon in a 5 oz or 12 oz foam bowl to dry completely. It may take a day or two to dry. This is a good Friday project to come back to on Monday!
Step 8 – If you have chosen to put candy in your egg, secure the wrapped candy in the plastic bag and place it in the egg through the whole that was left open.
Notice that now it is called an egg, not a balloon!
Step 9 – Prepare the paper maché paste again.
Step 10 – This time use the white paper strips, dipped with excess paste removed, to put 2 layers on the egg.
Step 11 – Set the balloon back in the bowl to dry completely. Remember it may take a day or two to dry.
Step 12 – Paint your egg! You may want to paint the egg all one color, let it dry, and then decorate it to look like an Easter egg. Use different colors of paint, glitter and/or glitter glue.
Step 13 – Let dry completely. Now you’re ready to enjoy!
Teresa Riggins
Find Paper Maché mixes at http://www.purefunsupply.com/SearchResults.asp?Search=paper+mache
More from my site
 9 Budget-Friendly Recipes for Summer
 Into the End by Bonnie R. Paulson Audio Book Review
 Bring The Beach Home with Pier 1 Imports #Pier1Outdoors #SummerOfEntertaining
 21 Effortless Christmas Hacks to Make Your Holidays Easier
 Crimson and Clover – Perfect for Thanksgiving
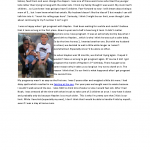 Pigs & Peacocks Children’s Book Contest
What a really pretty Easter Egg craft to make. I like making crafts and this is so cute. I will be making this awesome Easter craft. I already have a lot of the items. Thanks for the craft idea!
I love doing Paper Mache projects! That is an adorable craft.
I love your end results, I tried doing one this past Easter but the cats got a hold of it and it went down hill real fast loll
@tisonlyme143
I missed this to try at Easter, but this project would work anytime. I am eager to try with my grands!
This is an amazing craft.
Looks so pretty! I love this craft
This would b a lot of fun for the kid, both in making the paper mache and decorating and forming the egg.
This Easter egg craft is amazing and fun to do with the kids I would love to make a couple of these for next Easter!